RV Oxidation: Complete Guide to Causes and Professional Removal
RV oxidation is one of the most common issues RV owners face, especially in the high-altitude, dry climate of the Treasure Valley. That chalky, dull finish on your motorhome’s exterior isn’t just unsightly—it’s a sign that your RV’s protective clear coat is breaking down. The good news? Professional oxidation removal can restore your RV to showroom condition and protect it for years to come.
In this comprehensive guide, we’ll explore what causes oxidation, how to recognize it, and the proven removal process that keeps Boise and Eagle RVs looking pristine.
What Is RV Oxidation and Why Does It Happen?
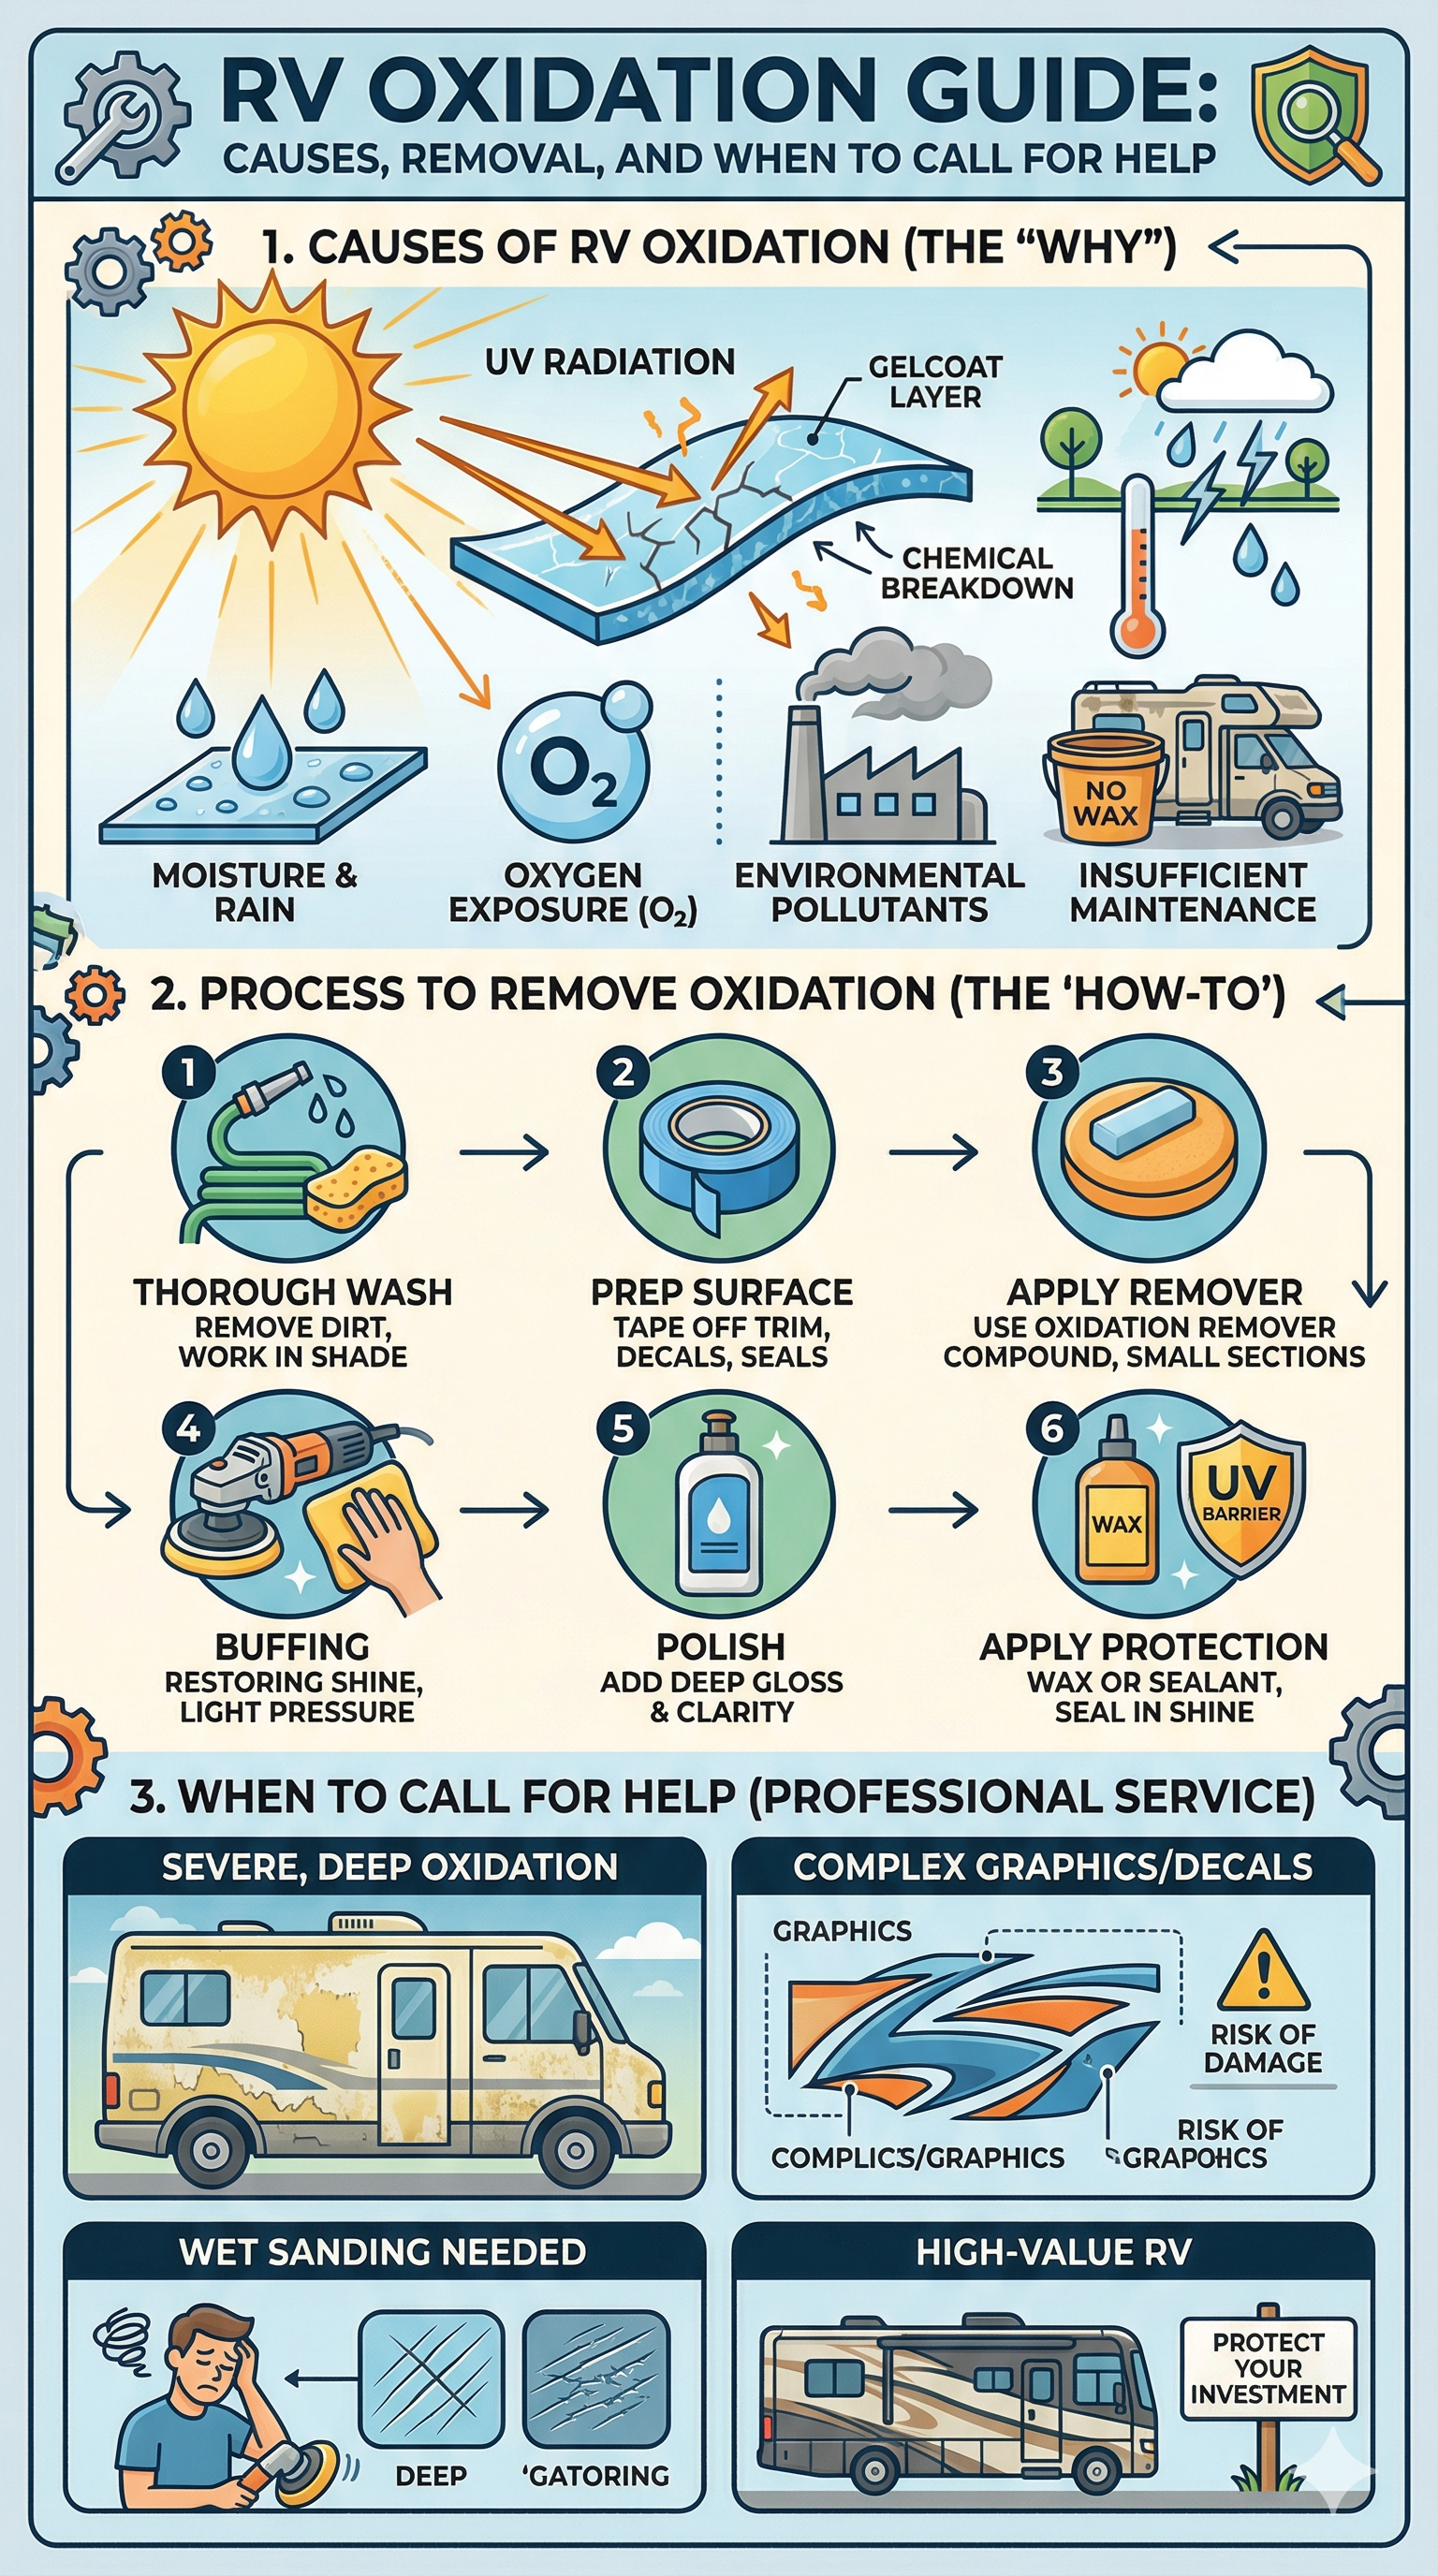
RV oxidation is the chemical deterioration of your motorhome’s exterior finish caused by exposure to the elements. When UV rays, moisture, and oxygen work together on unprotected fiberglass, aluminum, or painted surfaces, they break down the clear coat and create that characteristic chalky, gray appearance.
The Idaho environment is particularly harsh for RV finishes. Our high elevation, intense UV radiation, and dry conditions accelerate the oxidation process significantly. RVs that are stored outside without protection can show visible oxidation within just one or two seasons.
Key Factors That Accelerate Oxidation
Several environmental and maintenance factors speed up the oxidation process on your RV:
- UV radiation - Boise’s high elevation and clear skies mean intense, year-round sun exposure
- Temperature fluctuations - Daily and seasonal temperature swings cause expansion and contraction, stressing the clear coat
- Lack of protective coating - RVs without ceramic coatings or regular wax are especially vulnerable
- Improper washing - Using dish soap or harsh chemicals removes protective oils and damages the finish
- Outdoor storage - Even brief periods without cover increase oxidation risk
- Hard water deposits - Mineral-laden water left on the surface eats away at the clear coat
- Tree sap and bird droppings - Acidic contaminants bond to the finish and accelerate breakdown
- Salt exposure - Especially damaging for RVs near highways where road salt is used in winter
How to Identify Oxidation on Your RV
Early detection makes oxidation removal easier and more affordable. Here’s what to look for:
Early-stage oxidation appears as a hazy, dull finish that looks like a light film covering your RV’s exterior. The color looks washed out or faded, and the surface feels rough or chalky to the touch.
Advanced oxidation shows as a thick, chalky coating that rubs off on your hands, more pronounced color fading, visible pitting or etching in the clear coat, and in severe cases, the underlying fiberglass or paint becoming visible.
The most reliable test? Run your hand across your RV’s exterior. If it feels smooth and shiny, you’re good. If it feels rough, chalky, or grainy—you have oxidation.
The Professional RV Oxidation Removal Process
Professional oxidation removal is a multi-step process that goes far beyond a simple wash. Here’s exactly what certified detailers do to restore your RV’s finish:
Step 1: Detailed Assessment and Preparation
The process begins with a thorough inspection to determine oxidation severity. Light oxidation requires different techniques than advanced oxidation. The entire RV is then washed with pH-neutral soap to remove loose contaminants, and a clay bar treatment removes embedded particles that hinder restoration work.
Step 2: Paint Correction and Polishing
This is where the real restoration happens. Trained technicians use specialized tools and compounds to:
- Remove the oxidized layer of clear coat
- Level the surface and eliminate pitting
- Restore gloss and depth to the finish
- Create a smooth, reflective surface
The process involves multiple stages of compounds, from aggressive cutting compounds for heavy oxidation to fine finishing compounds for a pristine final result. This step typically requires 4–8 hours depending on oxidation severity and RV size.
Step 3: Final Protection Application
Once oxidation is removed and the finish is restored, the work isn’t complete without proper protection. Your technician will apply either a ceramic coating or premium sealant to prevent future oxidation. This protective layer creates a barrier against UV rays, moisture, and environmental contaminants.
- Ceramic coating provides 2–5+ years of protection with minimal maintenance
- Wax or sealant provides 3–6 months of protection and requires regular reapplication
Step 4: Quality Inspection
Professional oxidation removal ends with a detailed inspection under various lighting conditions to ensure uniform correction and a flawless finish.
Why Professional Removal Beats DIY Methods
You might be tempted to tackle oxidation removal yourself with consumer-grade compounds. Here’s why professional service is worth the investment:
Professional advantages include:
- Specialized equipment that DIY tools can’t match
- Expert knowledge of different surface materials (fiberglass, aluminum, painted)
- Access to commercial-grade compounds designed for heavy oxidation
- Proper technique to avoid damage to the clear coat
- Warranty on workmanship
- Professional-grade protective coatings applied after restoration
DIY methods with consumer compounds often leave streaking, uneven finish, or incomplete oxidation removal. Worse, aggressive DIY buffing can damage the clear coat beyond repair, requiring expensive repainting.
Preventing Future Oxidation: Maintenance and Protection
The best approach to oxidation is prevention. Once your RV’s finish is restored, maintain it with these proven strategies:
Protective Coatings - Apply ceramic coating for long-term protection. It’s the single best investment in preventing future oxidation.
Regular Washing - Wash your RV every 4–6 weeks with pH-neutral soap and microfiber towels. Never use dish soap or harsh chemicals.
Proper Storage - Cover your RV when parked for extended periods, or park in a garage or covered storage facility when possible.
Wax Application - If not using ceramic coating, apply premium RV wax every 3–4 months.
Quick Contamination Removal - Remove tree sap, bird droppings, and hard water deposits immediately to prevent them from bonding to the finish.
Interior Humidity Control - Use roof vents and maintain proper ventilation to minimize moisture that can affect exterior finishes.
The Timeline and Investment
RV oxidation removal typically takes 1–3 days depending on severity and RV size. A complete restoration with ceramic coating protection usually ranges from $1,500–$4,500 for most RVs, with variations based on length and oxidation level.
While this is an investment, compare it to:
- Repainting an entire RV ($5,000–$15,000+)
- Replacing fiberglass panels ($2,000–$8,000+)
- Chronic maintenance issues from progressive deterioration
Professional oxidation removal and ceramic protection are preventive investments that save money long-term.
Ready to Restore Your RV?
If your motorhome is showing signs of oxidation, don’t wait. The longer oxidation progresses, the more challenging and expensive the restoration becomes. Professional removal now can add years to your RV’s exterior lifespan.
Eagle Star Detail specializes in RV oxidation removal and restoration across the Treasure Valley. Our certified technicians use proven techniques and premium products to restore your RV to showroom condition, then apply long-lasting ceramic protection to prevent future damage.
Book your oxidation assessment today and discover what a properly restored RV exterior can look like.
About the Author
David Faustina
Founder & Certified Ceramic Coating Installer
David Faustina is a professionally trained and certified detailer specializing in paint correction, ceramic coating installation, and RV detailing. As founder of Eagle Star Detail, he personally works on every vehicle to ensure premium results and customer satisfaction.
Ready to experience professional detailing?
Eagle Star Detail specializes in professional mobile detailing throughout Boise and the Treasure Valley.