Maintaining that “showroom shine” on your vehicle isn’t just about pride; it’s about protecting one of your most significant investments. Whether you drive a daily commuter through Boise, a luxury sedan in Eagle, or an adventurous RV across Idaho, understanding how to properly care for its exterior is crucial.
But achieving that perfect finish isn’t just about having the right products; it’s about the correct order of operations.
Skipping steps—or performing them out of sequence—can do more harm than good, potentially causing fine scratches, swirls, or locking in contaminants.
Here is the universally accepted, professional 5-step appearance care process designed to revitalize and protect your vehicle’s finish.
Step 1: Wash (The Essential Foundation)
Every detail job, no matter how intensive, begins with a thorough wash. The goal here is simple but critical: remove all loose surface contaminants (dirt, dust, mud, road grime) without scratching the paint.
Why it’s first:
You must never touch your paint with a clay bar, compound, or wax if there is loose dirt present. That dirt will act like sandpaper under pressure, instantly damaging your clear coat.
Professional Tip:
Use the “two-bucket method” with grit guards. One bucket contains your soap solution, and the other contains clean water for rinsing your wash mitt. This prevents dirt you just washed off from getting rubbed back onto the vehicle.
Step 2: Clean (Decontaminate the Surface)
This is often the step non-professionals skip, and it makes the biggest difference in the final result. A “clean” paint surface isn’t just one that looks clean; it’s one that feels clean (like glass). This step involves removing embedded contaminants that washing alone cannot touch, such as industrial fallout, brake dust, tree sap, tar, and iron particles.
How to do it:
Use a specialized paint cleaner/fallout remover or, most commonly, a clay bar. The clay bar glides over the lubricated paint surface and safely pulls these embedded “specks” out of the pores of the clear coat.
Why it’s second:
You must remove these contaminants before polishing. If you move straight to Step 3, the buffer will catch these abrasive specks and swirl them into your paint.
Step 3: Polish (The Restoration Phase)
This step is the magic that creates that deep, brilliant shine. Polishing is the process of using very fine abrasives (compounds or polishes) to mechanically level the clear coat. This removes sub-surface defects like fine scratches, oxidation, water spots, and haze.
What it does:
Think of your clear coat as a microscope-perfectly smooth mirror. Over time, scratches make the surface jagged, scattering light and making the car look dull. Polishing levels those jagged edges, allowing light to reflect perfectly, creating gloss and depth.
Important note:
This step is optional if your paint is already in flawless condition, but for 95% of vehicles, a light polish dramatically improves the final outcome.
Step 4: Protect (Seal in the Shine)
Now that your paint is washed, clean, and perfectly polished, it is in its most vulnerable state. It needs a shield against the elements. The “Protect” step locks in the shine achieved in Step 3 and seals the pores of the clear coat.
Your protection options:
Wax (Natural): Provides a warm shine but lasts only 1-3 months.
Sealant (Synthetic): Durability of 4-8 months, often has a more “glass-like” look.
Ceramic Coating (The Ultimate): This is a long-term, semi-permanent bond with the clear coat that offers years of hydrophobic protection and chemical resistance. This is a specialty service offered by premium detailers like Eagle Star Detail.
Why it’s fourth:
You must polish the paint before you apply protection. Applying wax over a swirled surface won’t hide the swirls; it will just protect them.
Step 5: Maintain (The Final Upkeep)
Appearance care doesn’t end after you apply protection. The final step is an ongoing process: maintaining that layer of protection and the glossy finish. This step is about removing light, daily contaminants safely between your deep cleanings.
How to do it:
This involves using quick detailer sprays, spray waxes, or ceramic boosters. When you find light dust, fingerprints, or a fresh bird dropping, you safely wipe them away with a high-quality quick detailer and a microfiber towel.
Why it’s last:
This step relies on the hydrophobic protection you applied in Step 4 to allow contaminants to be removed easily without scratching.
The Order Matters
If you want your vehicle to look its best, the 5-step process is the blueprint for success. It ensures that every action you take is built upon a sound, clean foundation, ensuring a flawless, scratch-free, and long-lasting finish.
5-Step Appearance Care Process Infographic
See the infographic below for a visual summary of these steps:
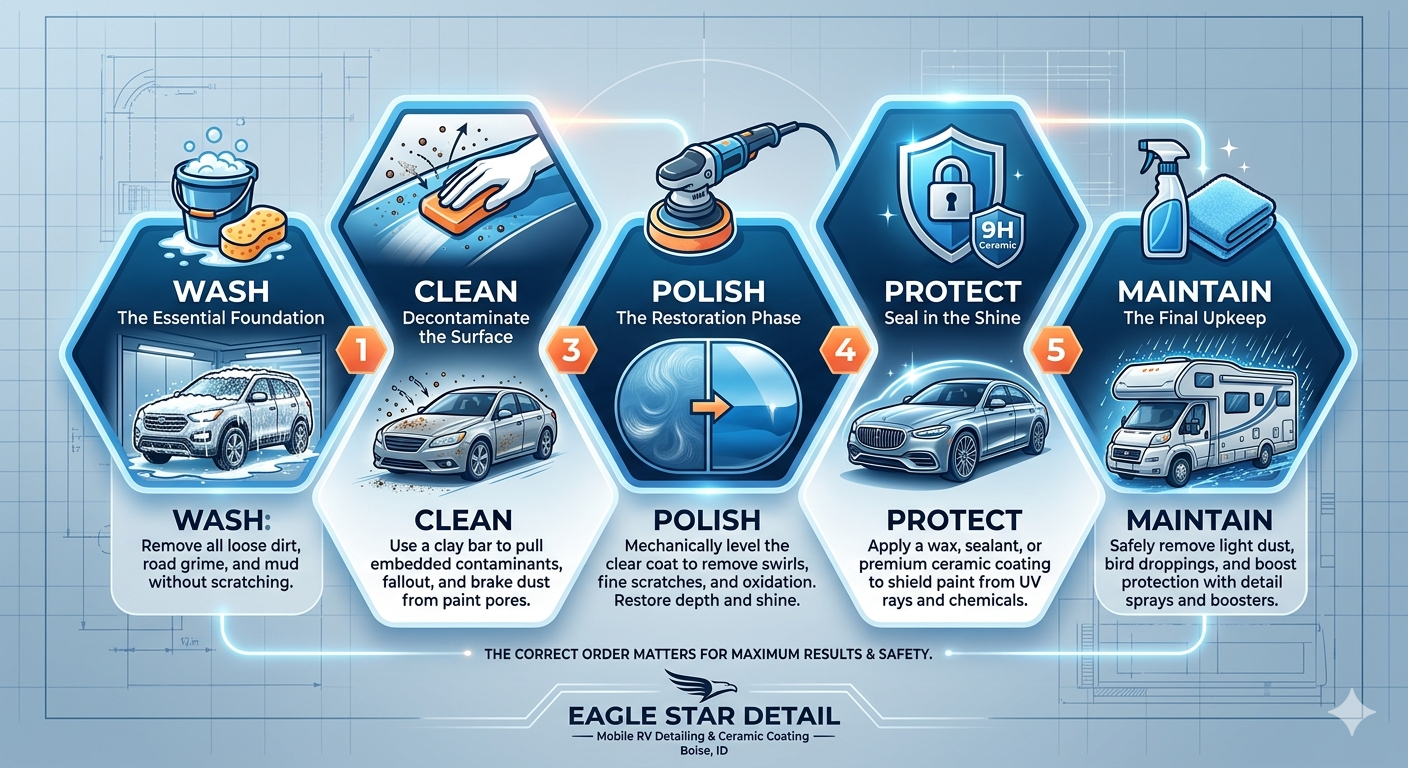
This infographic provides a clear, high-contrast visual overview of the correct ordering of the process, making it easy to remember the essential steps for professional vehicle care.
Why Eagle Star Detail Recommends This Process
At Eagle Star Detail, we’ve seen the difference that proper sequencing makes. Following the 5-step process ensures your vehicle receives optimal care, whether you’re maintaining a daily driver, luxury vehicle, or RV. Our certified professionals use this exact methodology for every detail project, combined with professional-grade products and System X ceramic coating for ultimate protection.
Ready to achieve that showroom shine? Schedule a professional detail with us today and see the difference expert care makes.
About the Author
David Faustina
Founder & Certified Ceramic Coating Installer
David Faustina is a professionally trained and certified detailer specializing in paint correction, ceramic coating installation, and RV detailing. As founder of Eagle Star Detail, he personally works on every vehicle to ensure premium results and customer satisfaction.
Ready to experience professional detailing?
Eagle Star Detail specializes in professional mobile detailing throughout Boise and the Treasure Valley.